There is an ancient charm to heating and cooking with wood. The irresistible draw of tending a fire on a cold winter day, and the cozy warmth of our natural home encircling us, gives us pause to be thankful and to feel the connection to our ancestors through our contact with the land and nature ~ through the straw, mud, rock and wood of our home and hearth.
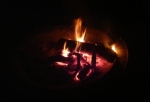
We have always wanted to use the wood stove to fire our hot water. We wanted to use the wood we burn wisely and efficiently and always thought we could get more out of the wood we use. When heating our home, there is always heat on the stove top, which allows us to cook soups and stews and stir-fry veggies. Inside the wood stove, we cook potatoes or cobbler among the coals. Still, couldn’t we devise a way to capture heat for our hot water tank, so that we could shower and bathe from the wood heat? Of course, this has been done by others in different ways, but we wanted to do it affordably and with little, if any, electrical output. Up until a few years ago, we heated the water in our water tank with propane. We always knew that was a temporary solution, but once you settle on one way of doing things (especially a way that requires no work, other than the monthly service fees, ad infinitum!), it is harder to find incentive to change it.
Nature is Perfect
When we lived in the tent (back in 1994) and for many, many lovely summer evenings over the years, we used black camp shower bags down the trail, which was definitely more work! We had to think ahead – plan our day, refill and hoist the bags full of water over our heads, and give them time to heat up. The beautiful part of this method is that the sun heats the water in the bags and, by virtue of natural law, gravity allows the shower water to flow effortlessly over us. Nature really is perfect. We try to respect and take advantage of the laws of nature in a lot of what we do.
The “Simple Life”
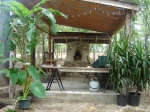
Oftentimes, the “simple life” is romanticized by those of us who yearn for times unencumbered by modern (in)conveniences. The truth is, the “simple life” ain’t really that simple! It can be a lot of work, but it can also be satisfying and full of joy. This applies to our desire to bring awareness to natural resources and how we use them. In the summer, to keep the house cool, we shut off the propane stove in the house kitchen, and our Summer Kitchen is open for business! Thanks to the beautiful nature of straw bale and earth architecture and some well-placed fans and shades, our home stays pretty comfortable year-round, even in winter and in summer. Outside in summer, we use a propane camp stove, the cob oven, the sun, and a campfire for cooking or any hot water needs.
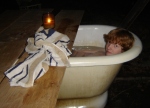
But what about hot showers and baths? For the summer, we cool off in the pond or the pool. We also enjoy hot-ish to cool showers, and for that we will stay with outdoor shower bags until we come up with a solar batch heater that is pressurized and heated by the sun. We also have our hillbilly hot tub, in which we can enjoy hot, therapeutic baths under the stars, even when the evenings are quite cool.

But during the autumn, winter and spring, we wanted to use the residual heat from our wood stove for our indoor shower. And we had special encouragement.
We decided not to change anything until our propane water heater broke, because “if it ain’t broke, don’t fix it”. It’s hard to tell just how many projects and how much child-rearing and cooking was accomplished in those 13 years that our propane tank worked for us, but we can say unequivocally – a lot! It worked well for us – and for that we were very appreciative – but it was time to move on and do what we had always wanted.
The Complicated Life
Once the tank gave out, our showers consisted of hanging a shower bag over the bath and drawing it up or down with a rope and pulley. We heated water on the wood stove during late fall, winter and early spring to fill our shower bag. During the times of year with no indoor wood fire, we heated a kettle up on the propane stove in the kitchen or on the camp stove out in the summer kitchen and brought it into the bathroom to fill the shower bag. Taking showers inside the house had replaced our outdoor camp showers over time, due to convenience and the fact that our trees have grown bigger over these 20 years, and the showers down the trail had become more shaded!
Now, inside the house, our family of 4 became accustomed to heating water in a large pot and showering with 1 to 2 gallons of water per person ~ now that sounds efficient! But unfortunately, that meant very short showers, and no one but Rex was real happy with this! This was a temporary (almost two-year-long!) solution, which allowed us to continue all of our day-to-day activities and still be able to shower. We all tried to be game for this new adventure, but on occasion there were a few refrains heard around here, such as “When are we going to have a real shower”?
All the while, we toyed with different ideas for heating our water. We didn’t want to go back to propane, and most of our options carried with them some major drawbacks.
Pros & Cons
 Weighing the pros & cons went like this:
- A regular propane water heater was certainly the easiest option and had the least start-up cost, but it would have kept us dependent on (“Frack and Iraq”) propane, which is a 50/50 blend of natural gas and crude oil.
- The tankless propane heater was the next easiest option, but it still uses propane and has to be cleaned out every 6 months to a year due to the lime build-up inside the narrow tubes.

 Solar thermal was our choice at first – Rex and two friends, Barry and Paul, built a solar thermal panel for just this purpose. While solar can be a great option, there were some big drawbacks for us. Our one-or-two panels would only pre-heat the water in the winter; we would still need a back-up system, as most people have unless they have several solar thermal panels.
- We considered the heat wand, a $600 copper tube that goes down into the electric tank. Checking the rated BTUs per hour, it seemed like it wouldn’t get the water hot enough just on its own by the sun, and a few of us like really.warm.showers. You can buy tanks that have internal heat exchangers built in, but they run about $1500. Another option for solar is an external heat exchanger. For us, being off-grid, these external heat-exchangers require more electricity than we would prefer to use. If we had grid-connected solar, we might be inclined to rethink this one. Our goal is to still use the solar panel/s in conjunction with wood-fired heat, if we can work that out. Otherwise, we will use it during fair weather on the summer kitchen or one of our other part-time buildings.
- For wood-fired heat, the biggest hold-up for us was where to place the hot water storage tank. We needed for it to be up in the air to take advantage of natural convection, but we didn’t think we had enough room with a conventionally-sized hot water tank. However, once we found the tank we were looking for that would fit, it was smooth sailing. 🙂
And the Winner Is….Efficient Use of Wood Heat for House and Water!
Ultimately, there was enough heat coming from the wood stove during at least 6 to 7 months of the year, and we wanted to be able to use it, allowing it to perform triple-duty heating the house and the water and cooking some of our food. Ultimately, this also ended up being our least expensive option, we have no monthly fuel charges, and we live in the forest (with lots of dead wood available). We wanted a smaller electric hot water tank, one that was shorter and would fit into the space we had envisioned, so we had to purchase a new tank. We went with 30 gallon capacity, due to the tank’s size dimensions. The copper pipe was the only other big expense for this system.
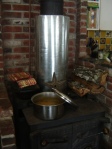
We made a thermosiphon loop of copper coil spiral-wrapped around the stove pipe. 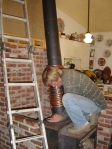 The key to the coil is: cold water goes in at the bottom of the coil – travels up the coil via natural convection, heating along the way – and hot water goes out and into the top of the water heater tank for storage. A big part of the thermosiphon loop lay in the placement of the hot water tank, because it needs to be high enough in the air to receive the heated water from the copper coil. A real bonus is the fact that this system requires no moving parts, which means there is less opportunity for mishap and it won’t be a constant drain on the electricity our solar PVs produce!

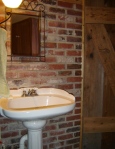
We elevated our tank above the bathroom sink and just above the thermal mass brick wall dividing the wood stove and the bathroom. We built a cob wall between the stove pipe and the water heater to allow heat transfer but to also protect the wood framing and equipment from excessive heat (see photo with coil below).
Water in the coil rises due to the natural flow of heated liquid in a thermosiphon loop. The heat from the stove provides the mechanism to move the water upward. This really heats up the water in the tank – really hot…which is why you want a Temperature Pressure Relief Valve (T & R valve), so that you don’t have an explosive situation on your hands! Unfortunately, a mixer probably would not work well in this system, due to the fact that internal mixers work with stable temperatures; whereas, our stove temperatures vary, based on how much or little we feed our fire. ***Therefore, with our system, we have to mix hot and cold water manually. Turning on hot water at the faucet must be done thoughtfully so as to not get scalded!

We have been using this system for a year now, and it works great! We have modified it, with the most notable difference after insulating and covering the copper coil recently, during this really cold winter. The unfaced fiberglass insulation (“unfaced” so that it has no paper backing to be a fire hazard!) allowed us to better capture and hold heat from the stove pipe, raising the pipe’s temperature significantly! The insulation did not diminish the heat radiating into the house; quite the contrary, heat actually radiated out further into the room than before! It also caused our fires to burn much more cleanly and efficiently, with no noticeable creosote build-up in the stove pipe now.
Also, our initial concern about using a 30 gallon tank instead of a 40 gallon has not been an issue, because water in the tank reheats pretty quickly, especially now with the insulated coil. With a hot fire, we easily get 5 luxurious showers and can also do the dishes! We will probably have to clean out the copper tubing at some point, just like the tankless propane heater, but all other factors make this a very promising solution for people who heat their homes with wood.
As long as there is a fire in the wood stove, the water continues to circulate and heat up. Even a small fire provides enough heat on a marginally warm day. What would have been wasted heat going out the chimney, has now become an efficient use of the energy embodied in the wood, now heating our water for a delicious shower or bath. Expectations exceeded!
**We will cover more detail about the copper coil wood-fired hot water system as well as detail about the solar hot water panel in upcoming separate blog posts. 🙂 Happy Adventuring!


 , stick cactus, pinyon pine and gambel oak (‘scrub oak’).
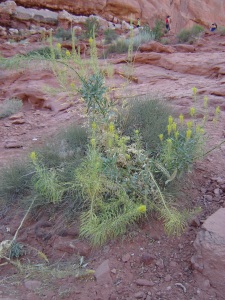 This gave us pause to think of how much water, care and pampering we give our plants to help them survive. Some plants require a lot more care than others to survive, especially non-native plants. It is hard to imagine moisture-appreciating plants like dogwood trees growing in the desert, or even the lupine we try to grow in Missouri, when lupine actually prefers cooler temperatures and higher elevation!


You must be logged in to post a comment.